Wednesday, October 21, 2015

Sloppy Sketti Squash Pasta

We have certainly moved along to autumn weather here in the DC metro area. Actually, it feels like we've skipped over autumn and gotten right down to winter! It's been unseasonably chilly the past few days and I am not ready for this weather, especially after such a lovely summer. One thing that has helped cheer me up and keep me warm has been a having the opportunity to cook at home and make some good ol' fashioned chilly weather comfort food!


We all know the classic autumn fresh fruits & veggies, right? Pumpkin, apples, pecans, brussel sprouts, and my favorite - a variety of squashes. One of my new favorite squashes to experiment with is the spaghetti squash, or as we call it in our house: sketti squash. It's fun to use the stringy innards as a substitute for a carb and dress them up just like you would a pasta. Douse them in pesto or marinara, even an Asian-inspired peanut sauce or curry. For this recipe, I took the experimentation to a whole new level and created what turned out to be something like a sloppy Joe mix! And it was SO good!


I started out with a vegetarian 'chorizo' style sausage I picked up with no idea what I was going to do with it. I cut off the casing, minced it up with my hands, and threw it in the pan with some oil... with still no idea what else to do! I looked around in the fridge and saw: leftover plain sketti squash, olive tapenade, and pre-made pesto. (We'll ignore the other stuff I saw: almond milk, raspberries, my boyfriend's RedBull... don't think those would've gone too well with vegetarian chorizo! ;-) The idea for this recipe immediately came to me and I just went with it! And boy, am I glad I did!


True, this dish was made to be vegetarian, but you could totally make it meat-eater-friendly as well. Simply use regular chorizo sausage instead of the vegetarian kind. Also, you can skip the goat cheese at the end if you want to make this a vegan recipe. You know how I like to give you options and this meal is versatile but still tasty any way you make it! And the leftovers would be great for a true sloppy Joe sami!


OK, let's get sloppy!


Sloppy Spaghetti Squash Pasta
Servings: 2
Prep time: 5 minutes
Cooking time: 15 minutes


Ingredients:
2 teaspoons grapeseed oil or extra virgin olive oil (EVOO)
1/2 vegetarian chorizo sausage link
1 teaspoon fresh sage, minced
1 cup spaghetti squash strands (recipe for preparing the squash here)
1/3 pound brown rice pasta, I used penne
2 tablespoons olive tapenade
2 teaspoons pesto
1/8 teaspoon fresh cracked black pepper (FCBP)
Pinch pink Himalayan sea salt
Sprinkle goat cheese crumbles


Start by placing a medium sized pot filled 3/4 with water on the stove over high heat. Bring the water to a boil and add the brown rice pasta. Add a pinch of salt and allow the pasta to cook according to package instructions, usually about ten minutes.


Next, place a large pan on the stove over medium heat. Add the grapeseed oil and allow it to heat up for about a minute.


Then add the chorizo sausage. To get the crumbled effect, slice the casing down the center with a sharp knife, then pull the sausage oil with your hand and crumble it into the pan.


Stir the sausage around with the oil. Then add the spaghetti squash strands.

Stir to combine the sausage with the squash.

Next, add the minced sage leaves and stir once more.

Allow the sausage and squash to cook over medium low heat for about ten minutes, while the pasta finishes cooking.

Once the pasta has finished cooking, remove it from the heat and strain it in the sink using a colander.

Place the pasta back in the pot you cooked it in and add the pesto and olive tapenade. Stir to thoroughly coat the pasta in the sauces.

Turn the heat off on the chorizo/squash mixture and remove the pan from the burner.

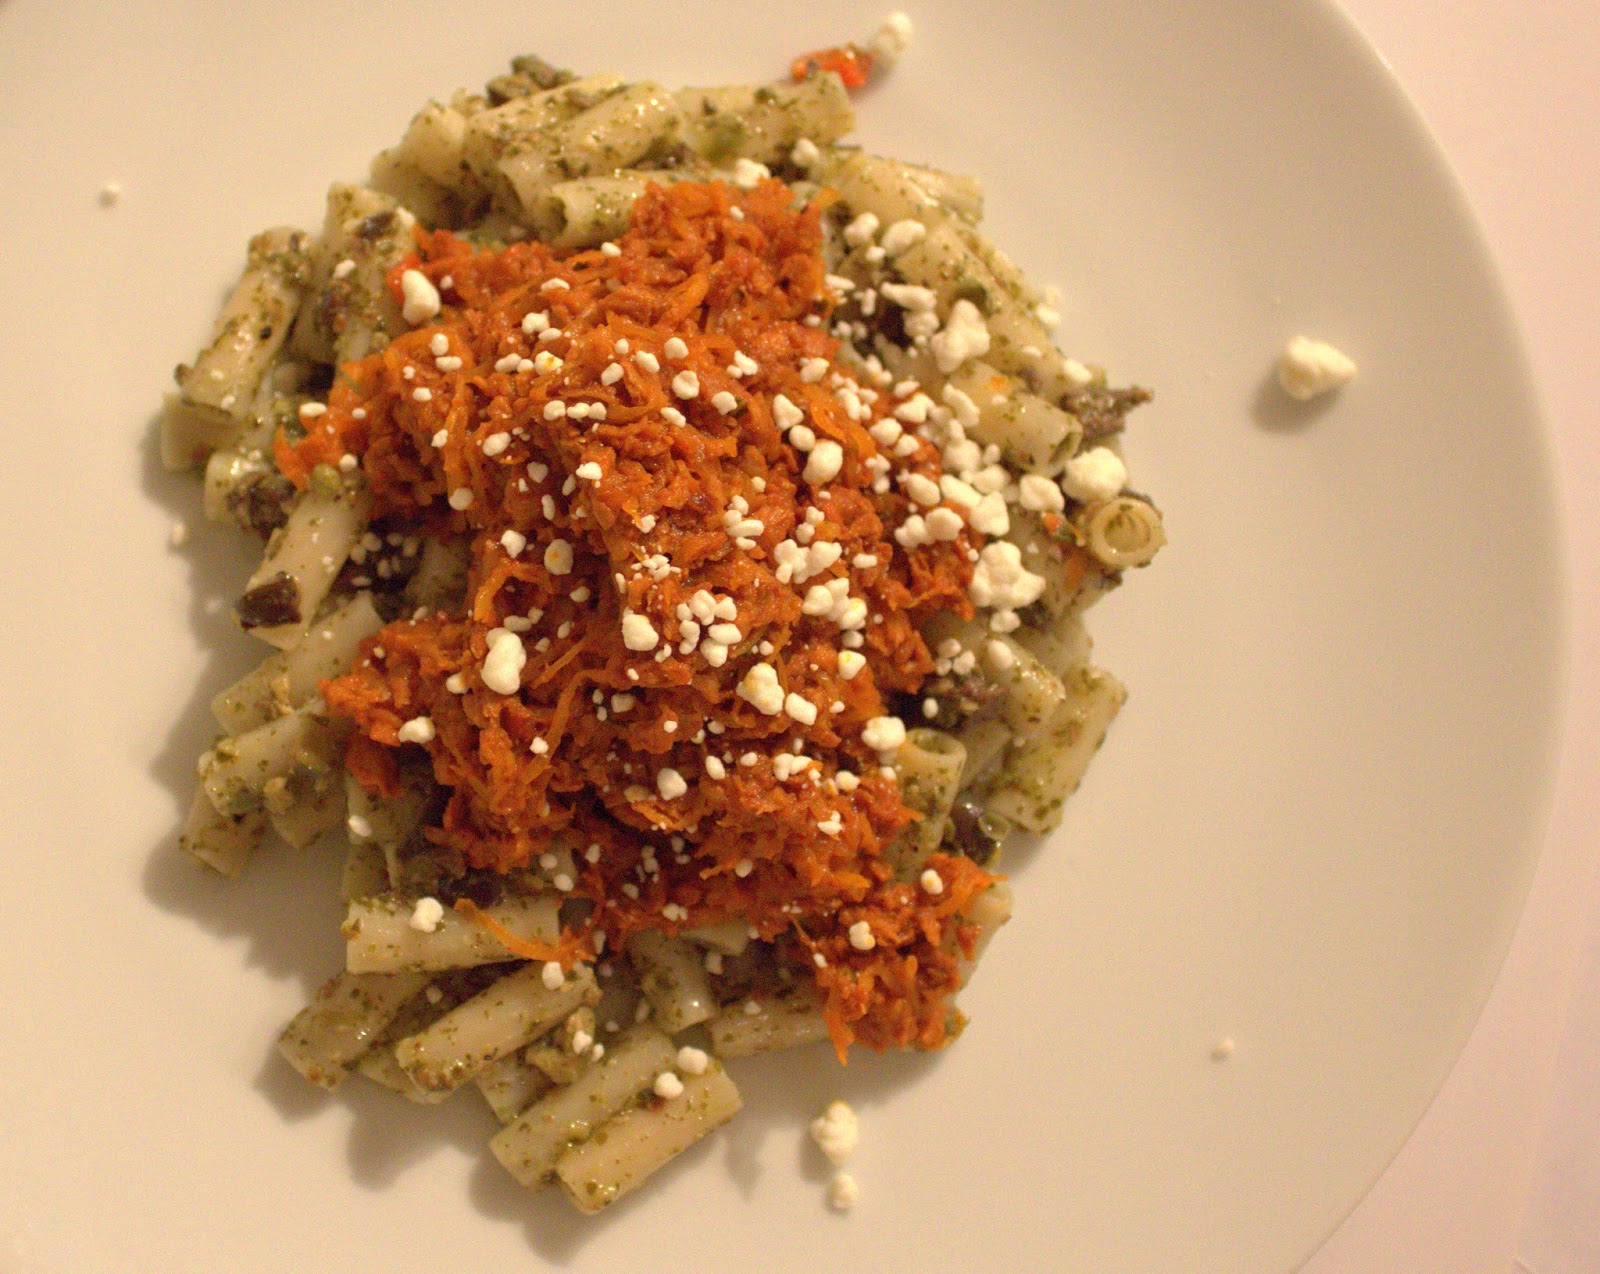
Use a large spoon to scoop the pasta onto your serving plate. Top the pasta with the chorizo/squash mixture and sprinkle the top with a spoonful of goat cheese crumbles, if you like.

Serve alongside a nice pumpkin spice beer and enjoy!

Salute!

P.S. It's best if you mix it all together! Yum!


Thursday, October 08, 2015

Veggie Oven Steamer

Happy first post of October everyone! It's officially fall and that means no more pool, fewer outdoor activities, shorter days... I know, depressing.  But all of that means more time to spend in the kitchen!

After our summer vacation I was determined to settle into fall and get back to being a little more on the healthy side, instead of flitting around from fast food joint to fast food joint (my ass saw a lot of Chipotle and Elevation Burger this summer!) and stuffing my face with refined sugar on vacation. This involves hitting up the grocery store on the regular basis, cooking at home, and consuming foods that have actual color to them rather than anti-color foods with lots of browns and whites.

Well, I spoke too soon. There is at least one white colored food that is allowed: cauliflower! Cauliflower is super healthy and it's one of my go-to easy to cook veggies I make on a regular basis. I I love how it tastes, raw or cooked, and heck - even my dog likes it, so I make sure to steam up some extra for her! Another go-to veggie you'll usually find in my fridge is broccoli. I'm always looking for different, new ways to cook my go-to favorites, so I was super excited when this idea for a veggie steamer came to me.

I had some capers and broth left from another dinner I made recently, so I decided to experiment and see if I could get those flavors to infuse in the steam and into the veggies. Whenever I think about infusing flavors, I think of garlic, so naturally I had to throw some of that in there. I wanted a little bit of a richness to the dish, so I added a little butter. Well, vegan butter for moi. And a little spice of course, so I went the crushed red pepper route.

An y'all. It was so good! I was so happy about how well this dish turned out because now I have an easy, quick, flavorful, and tasty side dish handy in my back pocket whenever I need something extra to go along with an entree. And bonus: my boyfriend gave it his seal of approval. He's basically a meat-and-cheese-etarian, so you know it's good if he likes it!

OK, let's get steamin'!


Oven Veggie Steamer
Servings: 1
Prep time: 5 minutes
Cooking time: ten minutes

Ingredients
1/4 cup chicken or veggie broth
1 teaspoon butter (I used Smart Balance vegan/non-soy)
2 cloves garlic, rough chopped
1 tablespoon capers
1 teaspoon caper juice
1 handful broccoli florets
1 handful cauliflower florets
1/2 teaspoon crushed red pepper flakes
1/4 teaspoon fresh cracked black pepper (FCBP)
Pinch pink Himalayan sea salt

Start by pre-heating your oven to 400 degrees Fahrenheit.

Cover a pie pan or baking dish in loosely with aluminum foil. Push the foil down so the center is on the bottom of the pan and the sides are up a little, kind of like a bowl.

Pour the broth into the center of the foil. Add the butter, garlic, capers, and caper juice.
Add the broccoli and cauliflower.
Sprinkle the crushed red pepper flakes, FCBP, and salt over the broccoli and cauliflower.
Now, wrap up the aluminum foil. Start by bringing the two long sides together in the center, fold, and then fold several more times until the foil is tight. Then just roll up the ends. You don't want there to be any holes on the bottom where the liquid could escape.
Now take a fork and poke some holes in the top of the aluminum foil - no more than five small ones. This is to let some of the steam escape.
Now place the whole thing - including the pie pan/baking dish - in the oven.

Cook for ten minutes.

Remove from the oven after ten minutes.

Gently open the aluminum foil, being careful not to burn yourself!
Scoop the broccoli and cauliflower from the liquid and place on your serving plate.
Enjoy! Salute!

Friday, September 25, 2015

Open Faced Egg & Veggie Sami

One week vacation + one week catching up = now having time to cook and blog. Yay!

My boyfriend, pup, and I drove up to Cape Cod for our annual Labor Day week vacation. Last year San Fran, this year Cape Cod. We wanted a super chill, relaxing, stay-in-one-place type of vacation, and that is what Cape Cod delivered. It offered plenty of opportunity to explore, but in a laid back kinda way. Cape Cod must have a hundred different beach spots and every one seems to have a breathtaking view and uniqueness to it. Monomoy Island had crystal blue waters, white sand, and a seclusion that created a feeling of being on a deserted island in the Caribbean. 

Nauset Beach had picturesque cliffs and seal sightings.

Skaket Beach was a great place to watch the sunset. We arrived early and observed dozens of people bringing chairs and setting up on the beach in loving pairs to watch the sun descend into the horizon.
Lighthouse Beach - well, we never made it onto the beach, but several times stopped to take photos from atop the cliffs because the view was so expanisive.
And our last stop for the week was First Encounter Beach. Incredible. We arrived at low tide and were able to walk about a mile out in sand and inch deep water before we found the bay. 
[For more photos of Cape Cod, visit my photography site.]

OK, enough about the views. Let's talk about the food!

We ate a lot of good food. I mean, we were in New England, so we had to eat plenty of seafood! I made sure we had oysters almost everyday (I'm obsessed!), we ate our weight in lobster - Brian even got a four pound one for himself!
[#cellphonepic]

And I even ordered cod at a fancy schmancy restaurant. Toss in some calamari and fish & chips and we had ourselves a proper New England seafood filled vacation!

Two non-seafood items we were obsessed with were the panini at this local to-go food stop, The Corner Store. Brian got the Italian style one with a bunch of meats, provolone, and spicy pepper relish, and I ordered the eggplant one with assorted veggies, hummus, and feta. And by obsessed I mean we stopped there almost every day - even on our way out of town. I don't normally eat bread of any kind, but I made a concession for this delicious, quick and easy food to go when we were in a hurry to get out on the beach. I have to say though, by the end of the week and that last sandwich on the drive home, the sami was feeling a little greasy, a little unhealthy, and giving me indigestion! That's when you know vacay is truly over. Womp womp.

I knew I could make a version of this sandwich at home and make it cleaner, healthier, and less greasy for sure. I decided to do it as an open-faced sami, which eliminates the need for the second piece of bread, limiting the grain intake. And I used Ezekial bread, which historically hasn't give me as many side effects as any other type or brand of bread. The hummus provides protein, but I wanted to kick it up a notch, so I added a fried egg to the top of my sami. 

I have to say, the Corner Store version was pretty damn tasty, but mine was on a whole other level. I actually really like eating healthy food, so when I know something is homemade, I controlled what went into it, and it's hearty and filling, I enjoy it that much more. This sandwich hit all of those notes for me and I hope it does for your as well. Whether you're a vegetarian or meat eater, this open faced sandwich will fill you up and have your taste buds singing!

Let's get makin'!

Open Faced Veggie & Egg Sami
Servings: 1
Prep time: 15 minutes
Cooking time: 25 minutes

Ingredients:
1/2 red bell pepper, sliced into slabs (see photo below)
1/4 sweet onion, sliced
6 1/2 teaspoons extra virgin olive oil (EVOO)
2 teaspoons balsamic vinegar
1 teaspoon garlic paste 
1 teaspoon dried Italian herbs
3 slices of eggplant rounds (see photo below)
4 slices of zucchini (see photo below)
1 egg
1 slice of thick bread (I used Ezekial bread)
4 heaping teaspoons hummus (I made some at home using Martha's recipe)
1 tablespoon feta crumbles
1 handful baby spinach leaves
2 slices beefsteak tomato
1/4 teaspoon fresh cracked black pepper (FCBP)
1/4 teaspoon pink Himalayan sea salt

Start by pre-heating your oven to 450 degrees Fahrenheit.

Place the quartered red bell pepper slabs to a cookie sheet and drizzle with a half teaspoon EVOO and sprinkle with a pinch each of salt and FCBP.
Put the bell peppers in the oven and set the timer to 25 minutes.

Next, place a non-stick pan on the stove over medium heat and drizzle in 2 teaspoons EVOO. Add the sliced onions.
Cook the onions on medium for about five minutes until they become softened, stirring often. Turn the heat to low, sprinkle with a pinch of salt, and cook for another five minutes, stirring often again.

Remove the onions from the heat when they're translucent and slightly browned.
Set aside.

Use the same pans in which you cooked the onions to cook the eggplant & zucchini. Place it back on the stove over medium heat. Drizzle in the remainder of EVOO and all of the balsamic vinegar. Add the garlic paste.

Place the eggplant and zucchini in the pan and sprinkle with the Italian herbs, and a pinch of each salt and FCBP.
Cook the veggies on the first side for three minutes and then turn over and cook on the second side for three minutes.

Remove the veggies and set them aside.
Let's use the same pan again! Crack the egg directly into the pan.
Cook on the first side for about three minutes, then flip over to cook on the second side. Remove the egg from the pan and set aside.
By now, your red peppers should be done. Remove them from the oven and set aside until ready to use.
Place your slice of bread into the toaster and toast to your preference.

Now, let's assemble our sami!

Slather the hummus onto your slice of bread. Sprinkle the hummus with a pinch of FCBP.

Sprinkle the feta crumbles over the hummus.
Place the roasted red peppers atop the toast over the hummus & crumbles.
 Then layer on the eggplant...
...and zucchini.
Now add the onions.
Couple more layers - hang in there!

Place the spinach on top of the onions:
 Lay the tomato slices on top of the spinach leaves.
 Lastly, place the over medium egg on the very top.
 VOILA!
And remember: you're going to need to use a fork and knife to eat this big guy!
 (Yes, it tasted as good as it looks!)
 I ate it by cutting it in half and then cutting it into bites from there.
 Salute!

Wednesday, September 09, 2015

Spicy Summer Salad

As summer is winding down, I'm sure so is your appetite for these types of recipes, so I thought I'd get in a last one before summer is officially over! I'm sneaky like that ;-)

This is the last recipe from the cookout my boyfriend and I hosted at our apartment complex's courtyard grilling area.  In my attempt to keep my side dishes at least somewhat healthy, I wanted to create an actual salad that was refreshing, summery, and low-cal.  I'm a huge fan of arugula, as you may have noted, so that was an obvious choice. But I wanted to do something slightly different, so I did a twist on a Mexican-inspired salad. This would actually be great if you threw it in one of those fried taco shell bowls! Though that would do away with the whole 'healthy' aspect. But hey, those things are delish! Go for it!

I kept the dressing super simple and light, but feel free to add some spicy ranch or some salsa mixed with sour cream if you're a dairy eater. (Or you could use some vegan sour cream... the possibilities are limitless!) This salad would be delicious under some sliced marinated steak, chicken, or shrimp if you wanted to make it a full meal. Basically this salad is versatile and your imagination could get seriously carried away. I always support that! Ooh just though of another one! Make the quesadilla from this recipe and throw this salad on top of it. Yum!

OK, let's get spicy!

Spicy Summer Salad
Servings: 6
Prep time: 15 minutes
Cooking time: 35 minutes

Ingredients:
1 16oz can black beans, juice drained
1 tsp cumin
1 tsp chili powder
1/4 teaspoon fresh cracked black pepper (FCBP)
Pinch salt
2 ears yellow corn, shucked
3 handfuls baby arugula
2 peaches, skin removed
Grapeseed or olive oil spray
1/2 jalapeno, seeds removed
Juice of 1 lime

Start by placing a small pot on the stove over medium heat. Add the black beans, cumin, chili powder, salt, and pepper to the pot.
Cook the beans with the lid on the pot for five minutes, stirring occasionally.

After five minutes, reduce the heat to low and let simmer another five minutes with the lid on, again stirring occasionally.

Remove the beans from the heat once they have softened slightly and keep the lid off.
Set the beans in the fridge to cool off while you prepare the rest of the salad.

[You can do this at the same time you're cooking the beans.] Place a large pot on the stove half full with water over high heat. Bring the water to a boil and add the corn. (You see four cobs here b/c I used the other two for something else. Pay no mind!)
Cook the corn for a good 20 minutes or until the kernels are fork tender.

Remove the pot from the stove and drain the hot water.
Pre-heat your grill or grill pan to high heat.

While the grill his heating up, prepare the base of your salad.

Add the handfuls of baby arugula and the beans to your serving bowl.
Set aside.

Minimally coat the corn, peaches, and jalapeno with the oil spray.

Place the corn, peaches, and jalapeno on the grill and cook on each side until you see blackened grill marks.

Once the veggies & fruit are grilled on each side, remove them from the grill.

Dice up the jalapeno and add it to the salad.

Cut the grilled peach flesh from the pit and slice the peaches into bite sized chunks and add it to the salad.

For the corn, stand the corn on the fat end on a cutting board and use a sharp knife to cut down the sides so the kernels fall off. Add them to the salad.

Drizzle the lime juice over the salad and toss to coat.

Serve immediately & enjoy!
Salute!