Monday, July 30, 2012

Farmers' Market Watermelon & Feta Salad


The farmers' market always has interesting fruits that you don't really see elsewhere, but you can also count on them for the regular ol' seasonal favorites. I was counting on the farmers' market last week and they came through for me as usual! I was on the hunt for a personal sized watermelon and luckily the last tent we visited had two left. I snatched one up and was excited I got there before they were all gone.

I have been seeing watermelon more frequently on menus at restaurants. Watermelon tends to be a very casual fruit to enjoy in the summer time. It's easy to cut into slices and eat as is while you're at the pool or a picnic. I think restaurants have been inspired by this all time favorite summer fruit and want to dress it up a little for their more sophisticated menus. Can't blame them. Watermelon and feta is a classic combination and I have had several iterations of this at restaurants in the area this summer. Most recently was at Acacia in Frederick, Maryland. They did a nice little amuse-bouche - a cube of vacuum sealed watermelon with jalapeño feta mousse on top. Very fancy. The one I am emulating in the recipe I'm going to share with you today I found at Sequoia on the waterfront in Georgetown, D.C. They served watermelon triangle slices with grilled feta cheese, slices of red onion, and a mint olive oil dressing. It was ah.may.zing. And that is what encouraged me to remake it at home.

I figured a personal sized watermelon would be perfect for me because I was making the salad for just me and my boyfriend. If you're making a larger salad or you can't find the personal size, go ahead and buy a regular sized watermelon. You can always slice up the leftovers to have as a snack later. I was able to find the red onion and fresh mint at the market as well. Farmers' markets have the *best* fresh herbs, so buy them there when you can. Here is my farmers' market bounty for this recipe:


I wanted to give you some modification ideas for this salad so you have some different ways to enjoy it. If you don't want to bother with the grilled feta, you can use feta crumbles. Another idea would be to dice up some stale white or sourdough bread, drizzle it with EVOO, salt, and pepper, spread the cubes out on a baking sheet, and toast them in the oven to create croutons. Toss the croutons in with the rest of the salad and voila! An extra bit of crunch for you to bite into. Last, if you are going to do the grilled feta, might as well not let that heated-up grill go to waste on cooking the cheese for less than a minute. Toss some shrimp in EVOO, salt, and pepper and throw them on the grill. You can add them to your salad or just eat them on the side.

OK, that's all I've got for ya. Let's get cookin'!


Watermelon Feta Salad

Servings: 4
Prep. time: 30 minutes
Cooking time: 1 minute

Ingredients:
1/4 cup extra virgin olive oil + 1 tablespoon for dressing the feta
1 handful fresh mint leaves, washed
1 personal size watermelon
1/4 small red onion, minced
1 package feta cheese block in water
3/4 teaspoon sea salt
3/4 teaspoon fresh cracked black pepper

To begin, make the infused oil 15 minutes before you start making the rest of the salad so that the oils from the mint have time to flavor the EVOO.

First, place your rinsed mint leaves at the bottom of a sturdy glass. Use a muddler (or the end of a another utensil) to smash the leaves, which will release their oils.


Next, pour the oil over the leaves and lightly stir.


Set aside for ten minutes before you start making the rest of the salad.

When you're ready to begin making the salad, preheat your grill or grill pan to high heat.

Begin by trimming the watermelon. First, slice off both ends. Then stand the melon on end and use your knife to begin cutting into the melon, from top to bottom, removing the skin in ribbons. This is what you will have when you're done:


Once there is no skin left, turn the melon on its side and cut into half-inch thick slices, like so:


Then cut the slices length-wise one way, then across the other way, leaving you with chunks or cubes. Place the cubes in your serving bowl.


Pick out any seeds.


Toss the finely diced red onion in with the watermelon.


Sprinkle with 1/2 teaspoon salt and 1/2 teaspoon pepper.


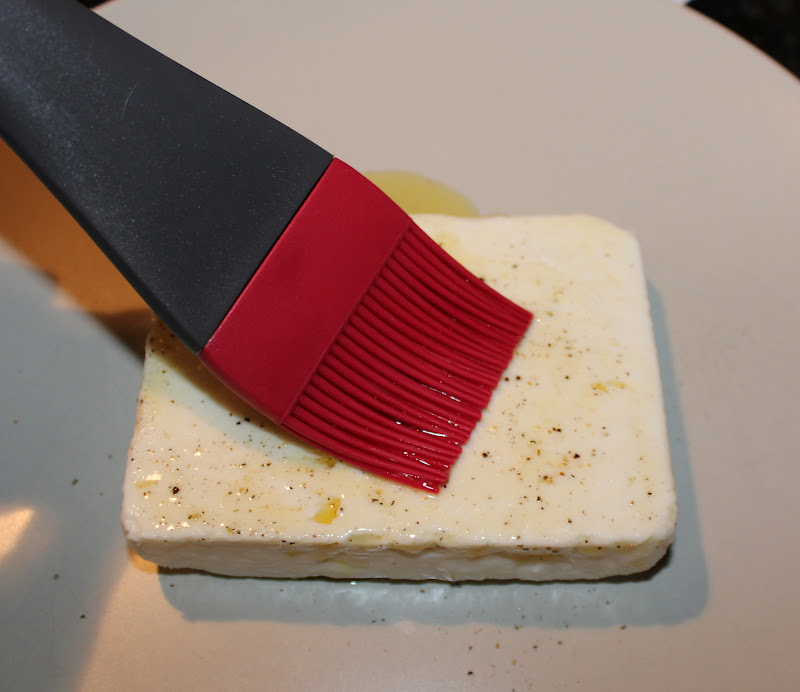
Remove the feta block from its package and place it on a dish.  Sprinkle each side with the remaining 1/4 teaspoon salt & 1/4 teaspoon pepper. Drizzle with 1 tablespoon olive oil and brush it over both sides of the cheese.


Place the cheese block on the super hot grill. Leave it there for 20 seconds and then flip it over. Leave on the second side for 20 seconds as well, and then remove it from the grill.


Place the cheese on your cutting board and dice it into cubes. Toss that in with the watermelon and onion.

Now your oil should be well infused with the mint. Set up a small colander so that the bottom of it (where stuff drains) is over the mouth of a small pitcher, like this:


Then pour your mint infused oil into the colander and allow it to drain through into the pitcher.  When you're done you will have only oil in the pitcher and no mint leaves, and it will be ready to dress your salad.

Drizzle the salad with the mint oil and toss lightly to dress. Serve chilled. Salute!


Friday, July 20, 2012

Farmers' Market Shrimp Orzo

For me, inspiration for cooking comes from a lot of different places. It can be a dish I had at a restaurant that I want to re-create, or the idea of a place I have traveled or want to travel and I try to think of ways to incorporate the essence of that place into a meal so I can experience it at home. I've mentioned in my other Farmers' Market pieces that inspiration comes from perusing the stands at the market for new and interesting fruits, vegetables, or herbs. And sometimes inspiration comes from food I've seen cooked on The Food Network or pictures of dishes in magazines or on Pinterest. Honestly, I'm so in love with food and cooking that inspiration can come from anywhere.

The inspiration for today's dish came from my pseudo-stepsister/friend, Lindsay. She sent me this recipe she made for herself and her hubby and thought I could play around with the basic idea and make it my own. It was such a unique idea and I loved it, so I got to work thinking of ways to give it that voraceRachel touch! I decided to go with a Greek version, since this recipe included orzo and orzo is prominent in Greek food. I chose to add wine, onion, feta, and oregano, all of which were not in the original recipe.

I got this idea the day before my weekly trip to the farmers' market so I decided to look for the ingredients I would need while I was there. Usually I go to the farmers' market with no idea what I'm going to make and let the ingredients I find dictate what I'm going to cook. But this time it was different. I knew what I wanted to make ahead of time and went to the market in search of specific ingredients: grape tomatoes, an onion, and fresh oregano. The fresh oregano was a no-go, but there were plenty of grape tomatoes and onions to choose from. I went with a bright white onion and a pint of tomatoes of all different shades and colors. Aren't they lovely?


One thing I really love about this recipe is that it's all made in one pot! That makes clean up so quick and easy. You just leave your leftovers in the pot, stick it in the fridge, wash your cutting board and a few utensils and call it a night! Love that.

One thing to note: Make sure you have a Dutch oven or a large skillet with high sides that can go in the oven. You're going to start this recipe on the stove and then transfer it to the oven, so an oven-proof pot or skillet with a tight-fitting lid is a must.

OK ladies and gents! Let's get cookin'!


Greek Inspired Shrimp Orzo

Servings: 6
Prep. time: 10 minutes
Cooking time: 40 minutes

Ingredients:
10 teaspoons extra virgin olive oil
6 cloves garlic, minced
1 medium white onion, chopped
1 teaspoon sea salt
1 teaspoon fresh cracked black pepper
1/8 teaspoon crushed red pepper flakes
1 pint cherry tomatoes
2 teaspoons chopped fresh oregano
3/4 pound dry orzo pasta
2 cups chicken stock
1 cup dry white wine (Sauvignon Blanc, Chardonnay - your choice!)
1 pound raw uncooked shrimp, peeled and deveined
pinch ground red pepper (cayenne)
1/3 cup feta cheese crumbles


Preheat your oven to 400 degrees Fahrenheit.

Place a Dutch oven on the stove over medium heat. Add 6 teaspoons of EVOO and all of the garlic to the pot. Let the garlic cook for one minute.


Add all of the chopped onions and let cook for two minutes.


Season the onions with 1/4 teaspoon sea salt, 1/4 teaspoon fresh cracked black pepper (heretofore referred to as FCBP), and 1/8 teaspoon crushed red pepper flakes. Stir to incorporate that into the onions.


After the onions have cooked for five minutes total and they have become slightly softened, add in the whole grape tomatoes. Sprinkle them with 1/4 teaspoon sea salt and 1/4 teaspoon FCBP. Turn the heat up to high and let them cook for five minutes, stirring occasionally.


Once the tomatoes have started to soften, stir in 1 teaspoon of the chopped fresh oregano.


Reduce the heat to medium and add in the orzo. Stir it into the veggies.


Next, pour in the chicken stock and wine.  Add 1/2 teaspoon of oregano and stir.


Bring this just to a simmer, stirring regularly to make sure that none of the pasta sticks to the bottom of the pot.


Once this concoction is simmering, remove it from the heat and place the lid on the pot. Place the pot in the oven on the top rack. Cook for ten minutes.


While the orzo is cooking, prepare the shrimp. Place them in a mixing bowl. Drizzle with EVOO and sprinkle in 1/2 teaspoon salt, 1/2 teaspoon FCBP, and a pinch of cayenne. Toss to coat them in these ingredients.


Once the orzo has been cooking for ten minutes, take the pot out of the oven and remove the lid. Set your oven to broil on high.

Use a fork to search through the pasta for the cherry tomatoes. Use the tines to pop the tomatoes and then squish them so that the juices spill out into the pasta.

Stir in the feta crumbles and then make sure the pasta is somewhat smoothed out on top.


Dump the shrimp on the top of the pasta. Arrange them in a single layer.


Place the pot back in the oven to broil the shrimp.


This will take anywhere from five to ten minutes, depending on the strength of your broiler. Just check on them periodically and remove the pot when the shrimp have curled and turned pink.


To serve, scoop large spoonfuls of the pasta and shrimp out of the Dutch oven onto your dinner plates. Serve hot and enjoy! Salute!


And a BIG thanks to Lindsay for thinking of me with this recipe! Loved it!

Tuesday, July 17, 2012

*Tropical*Strawberry*Sparkler*

What's better in the summertime than enjoying a cold, fruity beverage while lounging by a body of water? Not much else. These were my thoughts when my friends/neighbors (frieghbors) were discussing happy hour last week. One of the girls suggested we skip our usual neighborhood haunts and try a different venue - cocktails by the pool. Sold! When Friday rolled around I was craving something fruity and tropical, so I whipped up a drink concoction that incorporated those ideas. And because I didn't want to haul a cooler out to the pool with us, I thought I would make a frozen drink so that it would keep cold while we were relaxing outside in the summer heat.

I had some pineapple & passion fruit nectar in the fridge from a mojito I made a few weeks earlier, so I decided to use the rest of that in my drink. Since this was to be a frozen drink, I picked up some frozen pineapple and mango, along with a bag of frozen strawberries. Also laying around the house was about a quarter of a bottle of cachaça I needed to finish off, so I figured that could be the main liquor component. Something was missing though... something to make this drink extra special. And then it came to me: champagne. Perfect!

Substitutions can be made for some of these ingredients, depending on what you prefer or what you can find in your local grocery and liquor stores. There are a plethora of nectars to choose from in the Latin American section of the Shoppers Food Warehouse that I go to, so it's always easy for me to find a particular one I want to work with. But if you don't have access to a wide variety of nectars, you can always substitute pineapple juice or any tropical fruit juice you can find. As far as the frozen fruits, strawberries should be easy to find. If you can't find a mix of tropical fruit, stick with just the pineapple. I think that should be readily available in most stores. And as diverse of an area as northern Virginia is, I still was only able to find one brand of cachaça in the nearby liquor store. If I was only able to find one brand, I'll venture to guess that in other areas of the country, one might have a somewhat difficult time finding cachaça at all. No worries - just use a light rum in its place. And if you don't feel like spending the extra money on a bottle of champs, I suggest topping off your drinks with club soda. It'll still give you that sparkle and carbonation while not interfering with the other flavors.

I also wanted to mention some items you'll need for this recipe if you are planning to tote this drink out to the pool (or beach) like I did. I didn't want to bring a cumbersome pitcher to the pool with me, so I poured the drink mix into an empty and cleaned out quart bottle for easier transportation. In order to get the drink mix into this bottle, I needed a funnel. So make sure you have these two items handy when you're preparing this recipe.

Alright my little summertime happy hour lovers, let's get drinkin'!


Tropical Strawberry Sparkler

Servings: 8
Prep. time: 10 minutes

Ingredients:
1 16 ounce package of frozen strawberries, slightly thawed
1 16 ounce package of frozen tropical fruit, slightly thawed
20 ounces tropical fruit nectar
1 cup cachaça or light rum
1/2 bottle brut champagne
4 tablespoons agave nectar


Place slightly thawed frozen fruit in your blender.


Add in the fruit nectar, agave nectar, and cachaça or rum.


Blend until completely smooth.

Place an empty & cleaned out quart bottle in the sink with a funnel sitting securely in the top opening. Pour the drink mix through the funnel into the bottle. Screw the lid on tightly and shake the bottle for ten seconds.


Place the bottle in the fridge until you're ready to pack up for the pool (or beach).

When you're ready to hit the pool, pack the drink mix bottle and your bottle of champagne in your beach bag. If your pool is a public one like mine, you probably aren't allowed to have glass bottles. I got around this by putting the champagne bottle in a thick sleeve - kind of like a beer koozie. See?


If you don't have one of these, pour the champagne into a portable plastic container, like a Nalgene bottle.

To serve the drink, pour the fruity mix into a small cup, leaving some space between the drink mix and the rim. This space is for the champagne! Pour the champagne on the top of the fruity mix. Gently stir and enjoy! Salute!

Friday, July 13, 2012

Farmers' Market Fried Okra Subs

One of the things I enjoy most about cooking is challenging myself to try new things. I mean, how often in everyday life do you get to try something new? It's rare. In cooking, not only can you eat something new, but you have the opportunity to learn how to prepare and cook something new as well. The farmers' market always offers the chance to find something new with which to cook, and on my most recent trip to the farmers' market I decided that something new would be okra.

I know what you're thinking: okra isn't exactly some new fangled, unheard of, out of the ordinary vegetable. I realize that. But although I have eaten okra before, I have never prepared it or cooked it myself. Enter the challenge! Normally when I find something new to incorporate into my cooking, I do some research on how to clean, prepare, and cook it. Like the first time I used a rutabaga! The store was out of parsnips, which my recipe called for, so I had to make a game time decision (yes, that is a sports analogy. Travis and dad, aren't you proud?! haha) and picked up a rutabaga to use in the parsnip's place. Have you ever seen a rutabaga?! They are quite intimidating. I definitely headed for the computer first thing when I got back from the store to do a Google search on how to clean, trim, and slice a rutabaga. (How many more times can I say the word "rutabaga"? It's a fun word, itsn't it?!) But with the okra I decided to tackle it using just my wits and common sense. I figured out how to clean it and prepare it all on my own and was quite proud of myself! That's truly the great thing about cooking - it's such a self-esteem booster!

The idea for this sandwich came from a few different sources. One being my friend and neighbor, Katie. She was making a trip down to Charleston, S.C., where she went to college and mentioned that she was excited to eat some of her favorite southern foods - and fried okra was one of them. I went to school in South Carolina as well but never had the pleasure of tasting fried okra. When I saw the fresh okra at the farmers' market, I decided to take a swing at making fried okra myself. I didn't want to make just plain ol' fried okra... I wanted to make it into something kind of different. My boyfriend and I had experimented a few weeks prior with making our own jambalaya, so I decided to use the sauce base we used for that to make a sauce for the fried okra and turn it into a hearty vegetarian sandwich.

When I finally got around to making this sandwich, I had some smoked gouda cheese laying around, so I grated it and added it to this recipe. The smokey flavor of the cheese really complemented the other flavors going on in this sandwich - the fire roasted tomatoes, the Cajun seasoning, but if you can't find smoked gouda, try a smoked cheddar or smoked mozzarella even.

OK, I think that's all I have to say! Let's get cookin'!


Fried Okra Subs

Servings: 2
Prep. time: 20 minutes
Cooking time: 30 minutes

Ingredients:

For the Sauce:
2 teaspoons extra virgin olive oil
1/4 sweet onion, chopped
1/4 red bell pepper, chopped
1 can fire roasted diced tomatoes
3/4 teaspoons salt
1 teaspoons fresh cracked black pepper
1 1/2 teaspoon Cajun seasoning

For the Okra:
8 stalks of okra, sliced (see note below on preparation)
1 cup of flour
1/2 cup of whole milk
1 teaspoon Cajun seasoning
1/2 teaspoon fresh cracked black pepper
1/2 teaspoon sea salt
1/2 cup olive oil

2 sub rolls, each sliced down the center long-ways
1 cup smoked cheese, shredded


Note: When you're preparing the okra, first cut off the thorny tops and pointy bottoms and discard. Then go ahead and slice up the rest of the stalks.


Preheat your oven's broiler to the high setting.

Place a medium sized pot on the stove over medium-low heat. Heat 2 teaspoons olive oil for about a minute and then add the onion and red pepper. Let those cook for five minutes and then sprinkle in 1/4 teaspoon salt and 1/2 teaspoon fresh cracked black pepper.


Stir and let cook for another five minutes until they're softened and the onions have become somewhat translucent.


When the onions and pepper have cooked for ten minutes, add in the can of fire roasted diced tomatoes as well as the tomato paste. Stir vigorously to work the paste into the rest of the sauce, making sure there are no clumps.


Once the paste is incorporated, stir in the Cajun seasoning, 1/2 teaspoon salt, and 1/2 teaspoon pepper. Give it a good stir and reduce the heat slightly. Place the lid on the pot and allow the sauce to simmer while you cook the okra. Remember to stir occasionally.

Let's move on to the okra. Place three plates on your counter, side by side. Pour the milk onto one plate.


On the second plate, add the flour, Cajun seasoning, salt, and pepper.


Stir the powdered mix around to mix all of the ingredients together so that they're evenly combined.


On the third plate, place two paper towels over it. This will be used to drain the oil when the okra is done frying.

Pour the olive oil into a saute pan with high sides and place it on the stove over medium heat. Check if the oil is ready for frying by placing the end of a wooden spoon into it. If bubbles stream off the handle in a rapid fashion, it is ready.


Divide your okra slices in half. Add the first half to the plate with the milk. Toss them around in the milk to make sure they get fully coated.


Using a slotted spoon, scoop the okra slices from the milk and place them in the flour mixture. Use a fork to roll the okra around in the flour so that each slice is completely covered in flour.


Use the slotted spoon again to pick out the okra from the flour and gently drop it into your pan of olive oil.


Let the okra fry for about a minute on one side and then turn each slice over so that the other side can cook as well.


Allow the second side to cook for one minute and then use the slotted spoon to remove the slices from the oil. Place them on your paper towel-lined plate so that some of the oil can drain off.

Repeat this process with the second half of okra slices.

While your second batch of okra is frying, place your sub rolls on a baking sheet (cut side up) and put them in the oven under the broiler to toast.


Check on them to make sure they doesn't burn and then remove them once they're toasted to your liking.

Once both batches of okra are ready and your bread is toasted, you can start assembling your sandwiches.

First, coat one side of the roll with a few spoonfuls of sauce.


Then add a few handfuls - ideally half - of your fried okra.


Top it with shredded cheese...


...and then add a few more spoonfuls of sauce.


How good does that look?! Now you have a hearty, southern/Cajun inspired, satisfying vegetarian sandwich to devour! Salute!