Thursday, May 28, 2015

Banana Split for Breakfast

If you're a regular follower of my blog, you know that I have been on a health journey for the past nine months or so. Actually, longer than that. For about eight months before the proactive portion of the journey started, I was feeling a multitude of symptoms that my regular doctors weren't able to accurately diagnose or cure - even their symptom treatment did not work. After many months of suffering, I eventually sought help of a different sort: holistic/integrative healing. I got my blood tested and the results were surprising, yet uber helpful. For the first time in months I had some real answers and felt empowered to take control of my health.

From there, I began changing my lifestyle. I've made many changes over the past nine months that have improved my life, but the thing I started with was adjusting my diet. According to my holistic doc, I needed to pump up the protein, cut out all simple carbohydrates, stick to low glycemic fruits & veggies, and basically get a lot more nutrition & iron into my diet via green veggies and supplements for stuff it's difficult for vegetarians to get from food (i.e. zinc, B12). I always thought that being a vegetarian ipso facto made you healthy. Wrong. Being a vegetarian can be an extremely healthy way of living - if you go about it in a conscious way, ensuring you are getting adequate protein, along with the essential vitamins and minerals we, as humans, need to live. For the 19 years I had been a vegetarian to that point, I was doing none of that. And my body was telling me it was time for things to change!

To get started, I did some research and discovered one of my now favorite resources - Kris Carr, cancer thriver! She has a great book that explains how you need to balance out the pH within your body so that it functions correctly, and the best way to go about this is to eat a mostly raw, varied, plant-based diet. Her teachings make sense to me, so I went with it. One of the first changes I made was to my breakfast. I used to make or buy fruit laden smoothies (sugar/sugar/and more sugar) every morning, or stop at the deli on the way into work and grab an egg/cheese/bagel breakfast sami (cooked/dairy/carb). Anyway, I was at a loss as to what to eat for breakfast because I needed to eat something that was vegan, raw, nutritious, and low on the glycemic index - kind of a tall order! I came across this recipe on Pinterest and I swear, it was my savior! I've been making a version of this recipe at least twice a week for nine months now and I never get sick of it! In fact, I am excited every single day to eat breakfast because it is SO tasty and filling!

I had to switch up the chia pudding recipe for myself because I'm avoiding most grains (so no oats), so I'm sharing with you my time and tummy tested version. I love the raw raspberry jam in this recipe, but I have experimented with creating my own fruit additions, so I wanted to share one of those with you. I like the raw jams, but every now and then I treat myself with a higher glycemic cooked version. And the other thing I love about this recipe, besides the fact that it's delicious, is it's so versatile, you can pretty much add whatever fixin's you want. My go-to favorites are raw pumpkin seeds (for iron) and ground flax (for omega-3 & fiber). I generally use raw almonds, but toasted hazelnuts went really well with this recipe. And for an extra protein kick, I've been adding a plant-based protein powder. This is really a power-house breakfast and a great start to your day, whether you're vegetarian, vegan, plant-strong, or a regular ol' omnivore.

I'm so excited to share this truly life changing recipe with you today! Let's get jammin'!

Chia Seed Pudding
Servings: 4
Prep time: 5 minutes + setting up overnight
Cooking time: n/a

Ingredients:
1/3 cup chia seeds
1/3 cup shredded coconut, unsweetened
1 teaspoon (alcohol free) vanilla extract
1 dropper liquid Stevia
1 1/2 cup almond milk, unsweetened

Add the chia seeds, shredded coconut, vanilla, and Stevia to a jar with a tight fitting lid. I love mason jars for this!
Stir.
Pour in the almond milk.
Stir, making sure the chia seeds are evenly distributed through the milk and not settling at the bottom.
Place the lid on the jar, close it, and put it in the fridge to set up overnight or for at least 8 hours.
In the morning, you should have a nice, thick chia seed pudding. Ta da!

Blueberry Compote
Servings: 5
Prep time: 3 minutes + cooling for 2 hours if you want cold
Cooking time: 30 minutes

Ingredients:
1 12 ounce bag frozen blueberries
2 teaspoons powdered Stevia
4 1-inch by 1/4-inch wide lemon rind peels

Place a small pot on the stove over medium-high heat.

Add all of the ingredients to the pot and stir.

Cover the pot with a lid and let it cook for about 15 minutes, stirring regularly.

Once the blueberries have reduced and become liquidy, turn the heat to low and remove the lid.
Allow the blueberries to simmer over low heat for an additional 15 minutes until a thick jam-like substance is created.
Remove the pan from the heat and add the compote to a small mason jar with a lid.
Add the jar to the fridge and let cool for at least two hours before using if you want to serve it cold. Otherwise, it would be delectible served warm drizzled over some vanilla ice cream!

Banana Split for Breakfast
Servings: 1
Prep time: 5 minutes
Cooking time: 5 minutes

Ingredients:
1/3 cup almond milk
3/4 scoop vanilla protein powder (I used PlantFusion)
1 whole ripe banana, peeled
1 rounded tablespoon/scoop chia seed pudding (recipe above)
1 rounded tablespoon raw almond butter
3 rounded teaspoons blueberry compote (recipe above)
1 handful hazelnuts, chopped
1 handful raw pumpkin seeds
1 teaspoon flax meal

Start by toasting the hazelnuts. Place a small pan on the stove over medium-high heat. Add the hazelnuts and let them toast while you prepare the rest of the dish, stirring occasionally. Remove them from the pan when you can start to smell them toasting - about five minutes.

Next, prepare what I like to call protein powder pudding. Place the almond milk & vanilla protein powder in a small bowl and stir until a pudding-like substance is formed. Set aside.

Lay the banana on your serving plate and use a sharp knife to slice the banana down the center length-wise. Make sure to not cut all the way through - leave the bottom attached. Use your fingers to gently pull apart the center of the banana, making a resting place for the rest of the ingredients.
Use a large teaspoon to scoop the protein powder pudding from the bowl and place it in a rounded mound on one end of the banana.

Next, do the same with the almond butter, and place it on the opposite end of the banana from where the protein powder mound is.

Last, do the same with the chia seed pudding, but place that in the center between the protein powder pudding and the almond butter.
Using a teaspoon, scoop a some of the blueberry compote onto the almond butter, and spread it down the center evenly. You'll most likely need to repeat this two more times to cover the length of the banana from the almond butter to the protein powder pudding.
Sprinkle the top & the plate with the flax meal first, then the pumpkin seeds and chopped hazelnuts.
You're ready to serve!
How delicious and indulgent does this look?!
Salute!
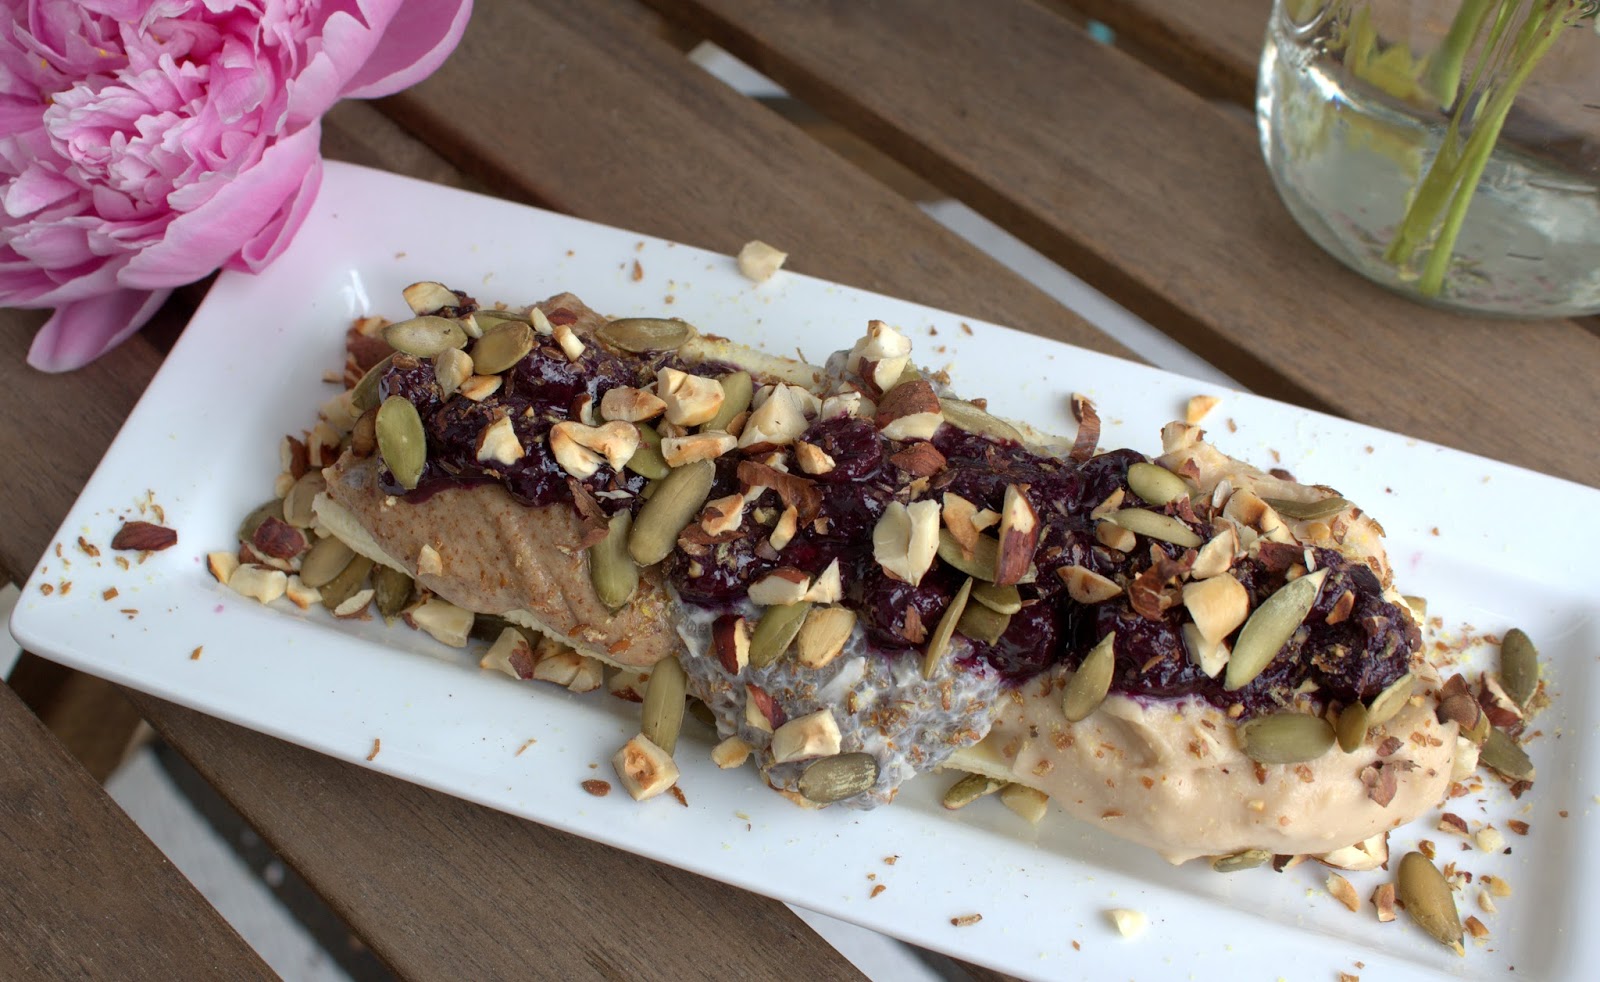
*Note: you can eat it like this by cutting it up with a fork and knife, or you can cut it up and place it in a bowl to mix together. Either way, it's delish!
[And one of only the PEONIES just because!]

Monday, May 18, 2015

Picnic Basket Pasta Salad

For Mother's Day this year I wanted to do something a little different. My friends Vanessa & Sean recently took us to one of their favorite wineries so I could take pictures of them for my photography final, and I loved it there so much I decided to take my mom and brother there for Mother's Day. 
 
Since I knew we were going to be wine tasting and having a picnic, I figured we should have something substantial to munch on to soak up some of the wine. Cheese, crackers, and fruit are standard wine pairing fare, so those were a go, but I wanted to make something heartier. Cue the picnic favorite: pasta salad! Mayo-free pasta salad, that is. Let's have a preview:
[More on this in a sec!)]
 
I'm always trying to think up new ways to make pasta salads, so as to not bore folks with the overdone Italian dressing over shells with black olives, Kraft cheese, and cucumber. We can do better than that! For some reason the idea to coat the pasta in tomato soup popped into my head! I get crazy ideas sometimes! I LOVE creamy tomato soup and I loved this idea because it took some time out of the prep process for me on a day when I would be rising early and  having a bunch of other errands to complete before traveling to the winery for the day. Always love a time saver!
 
So for the tomato soup, I recommend buying a grocery store brand. At my Harris Teeter, they always have their store brand of soup warmed up at the salad bar, as well as jars of it for sale in the refrigerated section. That's where I picked up the batch I used for this recipe. Please, whatever you do, do not use canned tomato soup from the soup aisle. Blah.
 
The cheeses: I was looking for a smoked mozzarella, but wasn't able to find it in the grocery store or even specialty market, so I went with the next best thing - fresh mozz and a smoked, semi-hard cow's milk cheese from Bavaria. If you're able to find smoked mozz, buy it and use all of that instead of getting two different cheeses as you see in my recipe below.
 
This pasta salad turned out to be delish and matched up perfectly with the beautiful day we enjoyed at the vineyard. We brought Milli along and enjoyed the sunshine.
[Milli taking a break in the shade.]
[Mom & bro fawning over Milli, as per usual.]
 

OK let's get picnicking!
 

Tomato Soup Pasta Salad
Servings: 1 large bowl
Prep Time: 20 minutes
Cooking time: Approximately 30 minutes
 
Ingredients:
1 medium sized zucchini, cut into 1/4 inch slices
3 tablespoons extra virgin olive oil (EVOO)
1 16 ounce jar pre-made tomato soup
2 handfuls grape tomatoes, cut into thirds
3 slices prosciutto, cut into 1/2 inch strips length-wise
3/4 of a 1 pound bag/box (so, 12 oz) of dry fusilli brown rice pasta
6 large leaves fresh basil, julienned
4 ounces smoked bruder basil cheese (or gouda), cubed
4 ounces fresh mozzarella, cubed
About 1/2 teaspoon pink Himalayn sea salt
About 1/2 teaspoon fresh cracked black pepper (FCBP)
 
Start by pre-heating your grill or grill pan to medium-high heat.
 
Lay your zucchini slices on a flat surface and brush the olive oil onto the top side of each slice. 

Sprinkle the slices with a pinch of salt and FCBP.
Place the slices of zucchini seasoned side down on your grill/grill pan.
Cook the zucchini on the first side for about five minutes, or until you get a nice char & grill marks. Then flip them over to cook on the second side.
While the zucchini is grilling, cook your tomato soup. Place a small pot on the stove over medium heat, pour in the soup, and bring to a boil.
 Once the soup comes to a boil, reduce the heat to low and let simmer until it's thickened and less soup-y, about 10 minutes. Once it's thickened, remove it from the heat and set aside to cool.
 
At this time, also boil the water for your pasta. Place a large pot filled 3/4 full with water on the stove over high heat. When the water boils, pour in the pasta and set a timer for it to cook as long as indicated on the box/bag. When the pasta is done cooking, drain it in a colander in the sink while running cold water from the faucet over it. Once drained, place the pasta in a large bowl to cool.
When the zucchini is softened and slightly charred on the second side, remove it from the heat and place the slices on a clean plate to cool while you finish the rest of the salad.
Next, cook the prosciutto. Place a non-stick pan on the stove over medium-high heat and lay the strips of prosciutto in the pan like so:
Cook the prosciutto on each side for two minutes. Once it's crispy, remove it from the pan and place on a plate covered in paper towels to drain and cool.
By now, the zucchini should be cooled. Place a couple/three slices on top of each other, slice through the slices down the center length-wise, and then cut width-wise into thirds or fourths, depending on the length of slices, like this:
To chop up the crispy prosciutto, place the strips on your cutting board and run a sharp knife through until you get large crumbs. 
 
Now you're ready to assemble the salad!

Pour the cooled, thickened tomato soup over the plain pasta.
Stir to thoroughly coat the pasta in the soup/sauce. Sprinkle with a pinch of salt and stir again.
Add the grilled zucchini and tomatoes.
Sprinkle with a pinch of salt and toss.
Add the fresh basil and gently toss.
Add the baby spinach, a final pinch of salt, and about a 1/4 teaspoon FCBP. Toss.
If you're taking this salad to a picnic, I recommend saving the cheese & prosciutto to add when you arrive. This keeps everything fresh and not soggy.

For picnicking, place the pasta salad in a glass or plastic to-go container and make sure to pack it with lots of ice in your picnic basket or cooler. Place the cheese in a food storage baggie and do the same with the prosciutto crumbs, adding them to your picnic basket/cooler close to the ice packs.

When you arrive at the picnic, pour the cheese over the pasta and toss it with the rest of the salad.
You can do the same with the prosciutto, but I kept it on the side so that vegetarians (me!) could eat the dish without the meat and meat-eaters could add it to their own plates.
Serve yourself a large helping and enjoy with a glass of wine.
Salute!