Monday, August 04, 2014

Summer Salad

Summer is in full swing here in the DC metro! We have actually had really beautiful weather this summer with very few scorching hot and humid days, so I am definitely thanking the weather gods this year. But no matter how comfortable the weather, summer still evokes the desire to eat light, fresh, raw ingredients. It just makes you feel good to be one with the season and eat what summer does best: lush produce!

A recent weekend trip to St. Michaels, MD...
 [Milli's first swim in the open water!]

...left my boyfriend and I feeling that we mayyyy have gone a bit overboard in the pigging-out department, and not by indulging so much in the lush summer produce. Well, for me it started with that leisurely day at the pool with Michelle. We drowned ourselves in sangria and then made our way next door to the local watering hole for happy hour, which included various fried foods. Then the boyfriend and I were up and away, where we brunched and supped and gorged on ice cream (twice) and cupcakes. All of this lead to my boyfriend begging for a dinner of "big salad" upon our return, which was very uncharacteristic of him! Our grand plans turned into laziness, as Sundays are wont to provoke, and before we knew it, we had each placed delivery orders. Two.separate.ones. Him Thai, me Indian. Oink, oink.

Those large portions lasted for days until I couldn't take it anymore and vowed to make that "big salad" for dinner so we could finally feel human again. And that's where this little summer beaut comes into play.

While I am a life long salad enthusiast, it's not boyfriend's first inclination. He does enjoy salad, but a specific kind, so I knew I would have to work in some key ingredients to get him fully on board. He likes fruity, nutty, interestingly dressed salads vs. the usual carrot/cuc/tomato/ranch-dressing type. I like to try to work within the parameters of what I think he will like, but still try to come up with something different, and that's what I did this time as well.

The base of any healthful salad is the greens. Spinach is super healthy for you, packed with iron, calcium, and vitamins A, C, E, and K. I like to mix it up a little and toss in some additional greens so keep things interesting. Any fresh fruit you add is going to just kick up the nutritional value even more and nuts are great for protein. Making your own dressing is the best thing you can do. That way you control all of the ingredients and are able to keep your salad on the healthier side. Store bought dressings include so much sugar and who-knows-what. Making dressing at home is fun, first of all, and second, so easy, it's just silly to not do it.

This salad was filling enough for me to eat without any meat protein, but I did include the chicken recipe I made for my boyfriend. The same sauce would probably work over shrimp as well, if you really need something extra but you don't eat meat. Make the sauce the same exact way, coat the shrimp in it, stick the shrimpies on some skewers, and grill 'em up just like we did with the chicken.

P.S. If you're making a list for grocery shopping, make sure to scroll all the way down so you get the ingredients for the chicken, salad, and dressing :-)

OK, let's get cookin'!

Summer Salad

Ingredients:

Chicken
Servings: 1
Prep time: 10 minutes
Cooking time: 17 minutes

3 chicken tenders or one chicken breast
Juice from 1/2 naval orange
Pinch of orange zest
1/8 cup balsamic vinegar
1 rounded teaspoon Dijon mustard
1 teaspoon EVOO
1/4 teaspoon FCBP
1 large pinch salt - kosher or grey

Start by preparing the barbecue sauce for the chicken.

Place a small pot on the stove over medium heat. Add the orange juice and zest along with the balsamic and stir to combine.
 Bring the mixture to a boil and let simmer for two minutes.

Remove the pot from the heat and turn the burner down to low.

Allow the burner to cool before placing the pot back over it.

Let the sauce reduce while you prepare the chicken, about five minutes.

Place the chicken in a food storage bag with tight closure. Use a meat tenderizer to gently pound out the meat.
Open the baggie and pour in the EVOO along with the FCBP and salt.
Seal the baggie and massage the oil and S&P into the chicken with your hands.

Check on the sauce - it should be slightly thickened by this time.
Remove the pot from the heat and stir in the mustard until it is completely combined with the initial sauce.
Open the baggie and pour the sauce over the meat.
Reseal the bag and use your hands to massage the sauce over the meat until all of the tenders are completely coated.
Now you're ready to grill!

Warm up the grill to medium heat. Once the grill is heated, place the chicken on the grate.
Allow to cook on the first side for about five minutes.

Then flip the meat to the second side and allow it to cook there for an additional five minutes.
Remove the meat from the heat (that rhymes!) and place it on a clean plate.

Allow the chicken to cool while preparing the salad.

Salad
Servings: 2
Prep time: 15 minutes
Cooking time: 2 minutes

1/2 bag of pre-washed mixed greens
1/3 bag of pre-washed baby spinach
5 brussel sprouts, shredded
1/3 of a pint of blueberries, washed
Seeds from half of a pomegranate
2 teaspoons extra virgin olive oil (EVOO)
2 handfuls feta cheese
1 handful candied (or not) walnuts

First I want to give a little instruction on two things: shredding the brussel sprouts & prepping the pomegranate.

Brussels: Cut off the stalk-y ends and discard.

Use a sharp knife to run through the sprouts to thinly slice.
Discard any of the thick centers.

Pomegranate: Follow this video.

Now to the recipe!

Place a non-stick pan on the stove over medium heat. Drizzle in the EVOO.
While the oil is heating up, layer two paper towels and place them on a clean plate next to the stove.

Once the oil is hot, add 2 brussel sprouts worth of the shredded sprouts to the pan.
The sprout shreds will begin to brown and crisp quickly, so only leave them in there for about 2 minutes, stirring constantly.
Remove the sprouts from the pan and drain them on the plate covered in paper towels while you prepare the rest of the salad.
Add the mixed greens and spinach to a medium sized salad bowl and toss to combine.
Next, add the shredded brussel sprouts and toss to combine them with the rest of the greens.
Sprinkle the pomegranate seeds...
...and blueberries onto the greens.
Toss to mix the seeds/berries in with the greens.
Now, add the cheese and toss again to spread it throughout the salad.
 Sprinkle the fried brussel sprouts over the salad.
Finally, take the handful of candied walnuts and crush them in your hand before sprinkling them over the salad.
Toss one final time.

Scoop out half of the salad - making sure to get greens as well as all of the goodies - into one serving bowl and do the same with the remaining half.
Make the dressing...

Dressing
Juice from 1/2 naval orange
1/8 cup balsamic vinegar
1/4 cup EVOO
1/4 teaspoon fresh cracked black pepper (FCBP)
Pinch of salt

This is a quick one!

Combine all ingredients in a dressing shaker or a food storage container with a tight fitting lid...
and shake vigorously for 20 seconds.

You should have a well combined dressing ready to pour over your salad.
Drizzle the desired amount of dressing over each serving bowl portion of salad and toss to coat the salad in the dressing.
If you are adding chicken to the salad, now would be the time!

Cut the chicken into bite size pieces on your cutting board...
...and then place the pieces onto the top of your salad.

Stick a fork in it and serve immediately!
 Salute!

Tuesday, July 29, 2014

Poolside Sangria

My first experience with sangria was an eventful one. I was in college and my roomies and I decided to make a pitcher one Saturday night while grilling out at my then boyfriend's apartment. We found a recipe, soaked the fruit in the booze as instructed, poured in the wine, and shoved it in the fridge to chill while we got ready for dinner. Grilling out took a little longer than anticipated (oh, maybe three hours longer) - we didn't have the right charcoal, then we didn't have lighter fluid, and everyone we sent out to remedy these problems took a really long time to complete their mission - so we decided to go ahead and start drinking our sangria. This was a recipe for disaster: empty stomachs + girls who weren't used to drinking wine + hours of sangria consumption/alcohol laden fruit eating = drunken hot mess. Sangria can be dangerous! That was a lesson we had to learn the hard way I suppose, as are most lessons when you're young!

It was quite a few years before I tested the sangria waters again, but being older and wiser, I tested the waters the smart and mature way: Jaleo. If you're going to do sangria, Jaleo is a great place to start! Not to say I haven't had my fair share of let's say interesting occasions while drinking Jaleo sangria (a PG example I can share: my former-co-worker-now-friend and I getting locked out of our office after hours while secretly wrapping the doors in Christmas paper...), but hey at least I knew what I was getting myself into at that point! My love for sangria is undying and I take the chance to indulge in it whenever I can.

My friend Michelle and I shared some pool time at my new abode this past Friday - an indulgent occasion to begin with - so I decided to whip up a batch of my own sangria for a poolside libation. I've made the Jaleo version of red sangria many times and it's always delicious, but I wanted to try something different, lighter, and more refreshing since we would be hanging outside in the sun all day. Jaleo also does a white version of sangria, so that's where I got the idea to do one myself. They use cava or champagne I believe, but I've been really into prosecco lately, so I knew that would be the base for my mix. Usually you soak the fruit in brandy, but I felt that would have too much of an influence on the flavor of our drink, so I chose vodka instead. Sticking with the theme of light and refreshing, I selected tropical fruit, and picked some pineapple sage from our balcony garden to use as opposed to the usual mint. This version turned out really well and we enjoyed almost the entire pitcher while sunning ourselves in the late July heat.

I highly recommend this light, white sangria for your next pool hanging sesh or summertime barbecue. Just make sure you have all of your grilling accoutrement before you start munching the alcohol heavy fruit! ;-)

Before we get started, I must give a shout out to my new favorite grocery store - TRADER JOE'S!! There is one on my new commute home from work, so I stop in as often as I can. When I was concocting this recipe, I was planning to use a papaya. I highly doubted I would be able to find a papaya anywhere, so I had a back up plan (pineapple), but good ol' TJ's came through for me! Not only did they have papayas, they had beautifully ripe papayas that I could use immediately - score! I love when a plan comes together like this! Here are all of the gorgeous fruits I was able to pick up at my local Trader Joe's for this recipe: mango, kiwi, limes, and yes - papaya! 
Let's get drinkin'!

Tropical Poolside Sangria
Servings: 1 pitcher
Prep time: 20 minutes + 2 hours for soaking the fruit in vodka
Cooking time: n/a

Ingredients:
1 mango, skinned and diced
1 kiwi, skinned and chopped
1/2 papaya (prep instructions to follow in recipe)
1/2 lime, sliced into wedges
10 pineapple sage leaves (if you can't find pineapple sage, use 8 leaves of regular sage + a teaspoon of pineapple juice)
1/2 cup vodka
1/4 cup agave nectar
1 bottle prosecco
16 ounces club soda

Start by adding your mango-
... and kiwi fruit to your pitcher:
This was my first time using a papaya and I figure many of you have never prepared one before either, so I want to share how I was able to cut it up for use in my sangria.

First I stood it up on one of the short ends and used a sharp knife to cut through the center, from top to bottom.
I used a spoon to dig out all of the black seeds and discard them in the trash.
I used the same spoon to scrape the fruit from the rind:
I put the strips of flesh on my cutting board and then chopped it up with my knife.

When you're done, add the chunks of papaya fruit to the pitcher with the mango and kiwi.
Next, place the pineapple sage and lime wedges in a shallow glass.
Use a muddler to muddle the lime and sage together, releasing the juice from the limes and the oils from the sage leaves.

Throw the lime & sage concoction into your pitcher.

Next, pour in the vodka and stir.
Place the lid on your pitcher and stick the whole thing in the fridge.
Allow the fruit & sage to soak in the vodka and chill in the fridge for at least two hours before continuing.

After the fruit has marinated for two hours, remove the pitcher from the fridge, take off the lid, and pour in the agave nectar. Stir to combine it with the fruit.

Next, pour in your entire bottle of prosecco.
Stir.
Last, pour in the club soda and stir once more.
Place some ice cubes in a short cocktail glass, then pour sangria into your glass over the ice cubes, allowing fruit and sage to fall into the glass as well.
Add a sprig of fresh sage to the top of your glass for garnish and serve immediately! Salute!

Wednesday, July 23, 2014

Flavorful Gnocchi and Veggie Ragout

Usually when a restaurant meal inspires me to recreate a dish at home, it's because the meal was so fantastic, so interesting, so out of this world, that I need to find a way to make it mine so I have it at my fingertips any time, day or night. Not really the case with this recipe...

On a recent date night with my love in Old Town Alexandria, I was super excited to try a particular restaurant I had been perusing online for over a year. (Talk about a build up!) I made reservations, I made us leave an engagement party early so that we could make it in time, and I wore my hottest early summer outfit. (More build up...) I won't go into all the ugly details (that's what Yelp is for!), but let's just say, the experience was not all I had built it up to be (isn't that always the case?!). The food was abysmal. There was better food at the engagement party we left! (Catered by my friend & former neighbor, Chef Scott!) I ordered a half portion of "seared potato gnocchi with local mushroom ragout, wilted Shenandoah Swiss chard, oven-dried tomatoes, shaved ricotta salata." Sounds incredible, doesn't it?! That's what I thought when I ordered it. Tasting it, however, was a different story.

It was a classic example of what I like to call the Restaurant Attempt at Vegetarian Cuisine. I have experienced this phenomenon too many times to count. I have come to realize that some chefs think if you take meat protein out of the equation, there is nothing left to work with. Flavor becomes non-existent, non-important, and the ingredients end up being a confusing hot mess. The hallmark characteristics of these dishes are: some type of pasta/starch, a weird sauce, and random odd-ball vegetables. Pea shoots? Sure! Yardlong? Why not?! Vegetarians must love weird stuff like that! Who cares if it makes an actual tasty, satisfying meal? I appreciate the experimental spirit, but just because it sounds like a good idea, doesn't mean it will taste good. Perhaps these chefs should prepare a plate of their vegetarian creations, take one bite, and determine if even they want to continue eating the rest of the dish. 

OK... rant over. The point of all that was to say that the dish I had at this particular restaurant was a sorry excuse for a vegetarian dish, or just restaurant food period. (The rest of their food was awful as well, so I don't think it was a vegetarian specific issue.) I couldn't help but think to myself that I could've made that dish at home, using the same ingredients, and make it flavorful, satisfying, and tasty. A marked improvement over the muddled flavors, tasteless cheese, and four (yes FOUR) gnocchi I got at this restaurant. As we signed our very expensive tab, I vowed to myself I would do just that - recreate this dish at home and make it something people would happily eat - and blog it!

I switched up the concept from the original a little, to make it my own, and to make it in a way I thought would develop the best taste considering the base of ingredients I had to work with. I chose to use the chard to make a pesto that would coat the gnocchi. I picked my own mix of mushrooms, added caramelized onion to the ragout, and changed out the ricotta salata for a more pleasing cheese. It turned out to be one of those meals that's so tasty, you can't wait to get home to eat the leftovers for dinner the following day! (I know this from experience...) At the restaurant, I ended up not even being able to finish my small plate, but this recipe is guaranteed to make you want to lick clean your dish!

I like to take care of the meat eaters out there, so while this dish is meant to be a vegetarian rock star!, I think chorizo would be a great addition here. Just cook it up following package instructions and stir it in with the meat eater's portion of the ragout before piling on the gnocchi.

Now let's get cookin' good lookin'!

Better Gnocchi & Veggie Ragout
Servings: 4
Prep time: 20 minutes
Cooking time: 35 minutes

Ingredients:

Tomato & Mushroom Ragout
1 large carton of whole grape tomatoes
1 clove garlic
1/4 cup extra virgin olive oil (EVOO) + 1 teaspoon EVOO for frying the sage leaves
1/8 cup red wine (I used Syrah) + an extra teaspoon when cooking mushrooms
1 teaspoon fresh cracked black pepper (FCBP)
1/2 teaspoon kosher or grey salt
1/4 teaspoon ground turmeric
1 pinch dried red pepper flakes
1 medium sweet onion, sliced thin
5 large shitake mushrooms, de-stemmed
1 carton of sliced cremini or button mushrooms
1 17 oz package dry gnocchi
4 sage leaves
Pecorino romano cheese for shaving over finished dish (if you can't find PR cheese, substitute Parmesan)

Preheat your oven to 400 degrees Fahrenheit.

In a medium sized baking dish, add your washed grape tomatoes. Grate the clove of garlic over the tomatoes and stir to mix the pieces in throughout the tomatoes.
Next, pour the wine and 1/8 cup of the EVOO over the tomatoes/garlic. Stir to coat.
Sprinkle the turmeric, red pepper flakes, 1/2 teaspoon FCBP, and 1/4 teaspoon of salt over the tomatoes.
Stir to distribute the spices over the tomatoes.
Place the tomatoes in the oven to cook for 30 minutes, stirring occasionally (every ten minutes at least).

While the tomatoes are cooking, caramelize the onions.

Start by placing a large skillet on the stove over medium-low heat. Pour in 1/8 cup EVOO. Add your sliced onions to the pan and stir to coat the onions in the oil.
Allow the onions to cook and soften, stirring often...
[this is how they should look at five minutes]

At the five minute mark, add a pinch of salt and stir.

After ten minutes, they should be caramelized and light brown in color:
Remove the onions from the pan after cooking for ten minutes and set aside.

In the same pain you cooked the onions, add 1/8 cup EVOO.
Add your mushroom mixture to the pan. Stir to coat the mushrooms in the oil, then add the remaining 1/8 cup of EVOO as well as 1/4 teaspoon FCBP and stir again.
When the mushrooms have been cooking for five minutes, add the splash of wine and stir.

Allow the mushrooms to cook for ten minutes total, stirring often.
After ten minutes, remove the mushrooms from the heat and set aside.

By this time, your tomatoes should be about done cooking. They will be soft and juicy, like this:
Remove them from the oven and set aside while you prepare the pesto.

Before starting the pesto, set a large pot 3/4 full with water to the stove over high heat. It should heat up and come to a boil by the time your pesto is finished. When it begins to boil, add the gnocchi and allow them to cook as indicated on the package instructions - usually no longer than four minutes. You can tell when they're done because they will float to the surface. Place a strainer in the sink and when the gnocchi are finished cooking, dump them in to the strainer to drain. Leave them there until you are ready to mix them with the pesto.

Swiss Chard Pesto
1/4 cup pinoli (pine nuts)
1 cup Swiss chard, leaves removed from stems
1/2 cup fresh basil leaves
1/4 cup grated parmesan cheese
1/4 cup EVOO
1/4 teaspoon FCBP
1 pinch grey salt

Place a small skillet on the stove over medium-low heat. Add the pinoli.
Cook the pinoli for no longer than five minutes, stirring often - you do not want these little guys to burn!
Remove the nuts from the pan and set aside on a clean plate to cool.
Place the rest of your dry ingredients in a food processor. Add the pinoli once they have cooled slightly.
Next, take a picture of your adorable puppy... oh wait, that's just what I did!
Back to the pesto...

Turn on your food processor, and slowly stream in the EVOO. You will have a creamy, smooth pesto:
Set the pesto aside while you put together the rest of your dish.

Assembly

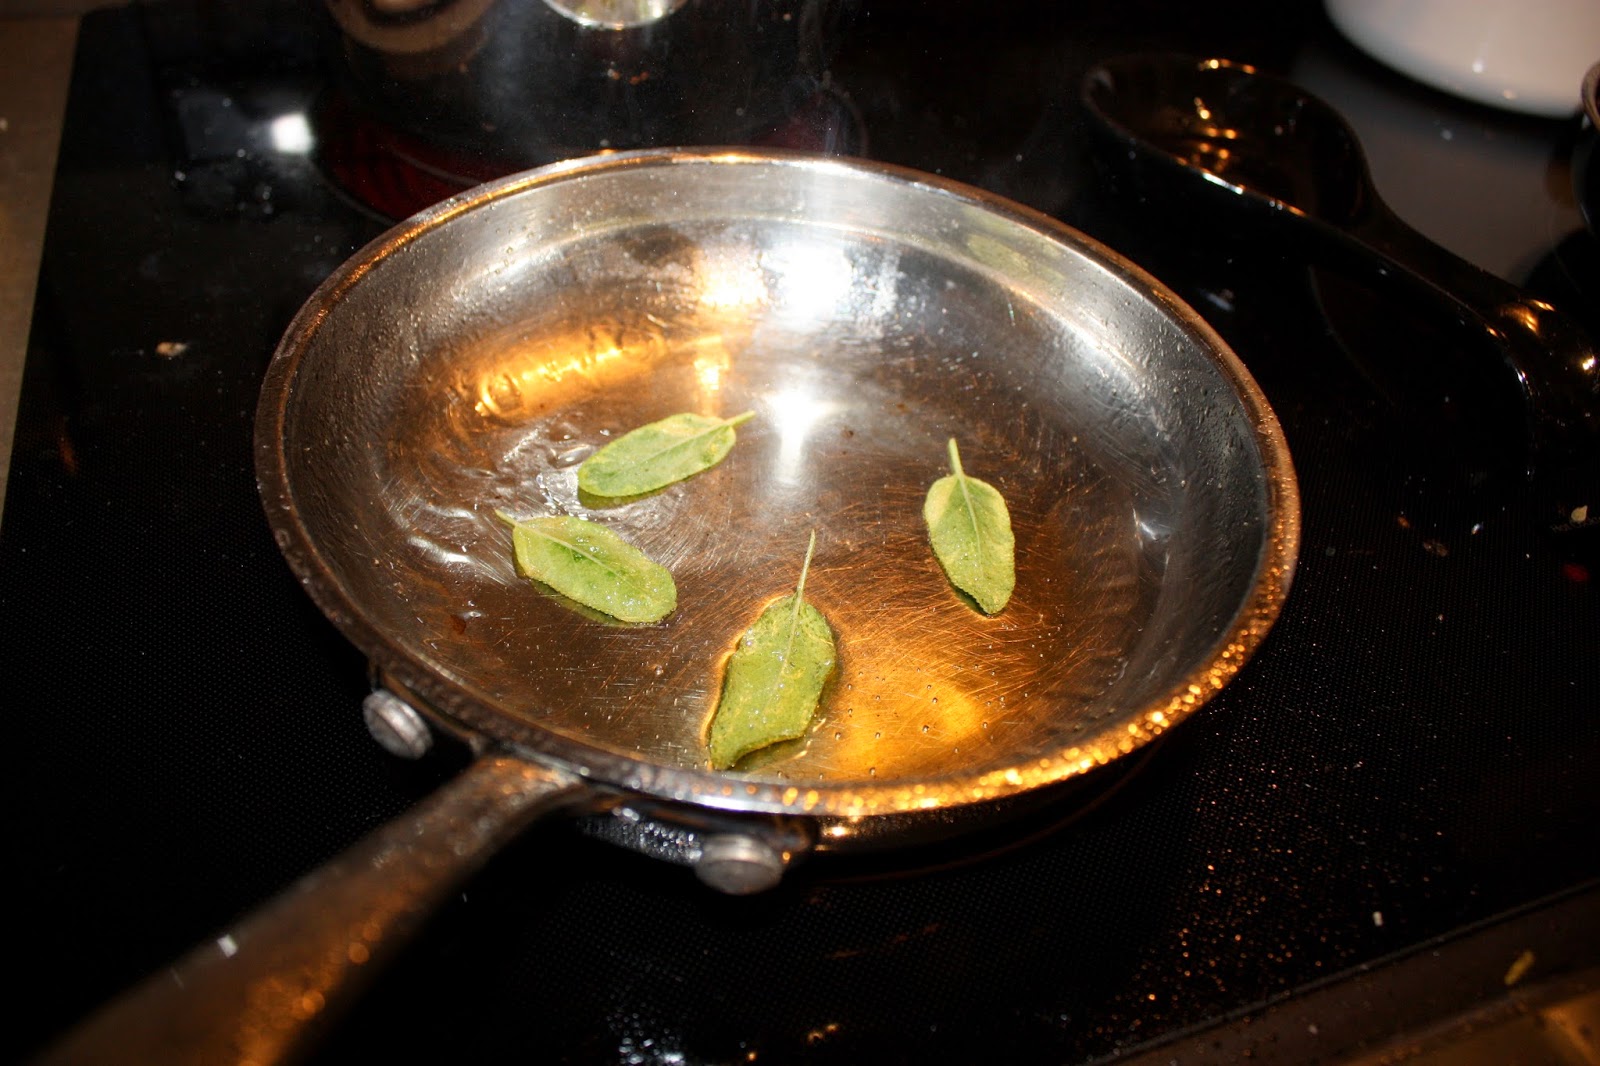
Place the pan you used to toast your pinoli back on the stove over medium-low heat and add the extra teaspoon of oil. Place the sage leaves in.
Let them cook on one side for about 30 seconds, then flip to the other side for 20-30 seconds until they are fried. Remove from the pan and place them on a paper towel to soak up the excess oil. Set aside.

Now, arrange your tomatoes, onions, and mushrooms side by side for ease of access.
Place the tomatoes in a large bowl. (Squish any that haven't popped yet with the tines of a fork.)
Next add the onions...
... then pile on the mushrooms.
Stir!
You should now have an empty baking dish. Scoop the pesto into this baking dish and pour the gnocchi in over them. Stir to thoroughly coat the gnocchi in the pesto.
Use a ladle to spoon the ragout into the bottom of a bowl.
Add a couple of spoonfuls of pesto coated gnocchi to the top of the ragout.
Shave the pecorino romano from the block directly onto the top of the gnocchi and ragout using a vegetable peeler or cheese grater and crumble the fried sage leaves over the dish.
Serve al fresco with a glass of the wine you cooked with...
Salute!
[Photo cred to the boyfriend for these final few pics]

And another pic of the pup for good measure! She loves hanging out in the kitchen with me while I cook.

Tuesday, July 22, 2014

Back At It!

"There is nothing like returning to a place that remains unchanged to find the ways in which you yourself have altered."

What a beautiful, thoughtful, and appropriate quote to summarize my return to blogging. I have been gone for some time (seven and a half months!), but it's nice to know that I have my sweet vorace. to come back to. Like the quote says, vorace. remains unchanged, but I, myself, have altered. 

The blogging trailed off around Thanksgiving and I chalked it up to the inevitable busy-ness of the holiday season, but the truth is I became very distracted and somewhat consumed by the exciting appearance of a new person in my life. I found my brain capacity focusing on day dreaming of sparkling blue eyes instead of concocting new recipes, and time usually spent cooking was now being devoted to new adventures with this special someone. Even if those "new adventures" sometimes consisted of ordering takeout (we practically kept this place in business!) and watching reruns of The Office on Netflix, I happily traded in my spatulas & computer for time well spent next to my new guy on the couch. I know, how cliché. But love is a  cliché and one I can't get enough of, so I just went with it!

Cut to a few months later and I sold my condo - said goodbye to this kitchen where I did the majority of my cooking for vorace. -
[view during staging]

- and moved to a brand-spankin'-new apartment with my man, my pup in tow! Very exciting! It's been a super busy few months, but things are finally starting to slow down and settle in, so I figured I could dip my toe back into the warm, toasty, welcoming waters of vorace. once again. I have missed it, after all.

I had very little spare time while continuing to get unpacked and settled after the move, so I took the opportunity to brush up on something I'm not very adept at: following a recipe. How ironic! I'm very much a cook-by-intuition kinda gal, which 95% of the time works out very well for me. But when you are dead tired and cranky from house prep, packing, moving, unpacking, and negotiating a sale, there is very little leftover for creativity. I wanted to cook meals at home after months of nothing but take-out, so I turned to my ol' buddy Pinterest for some recipe support. Many of the recipes pinned to Pinterest are from bloggers like myself, so I was able to study their ways while following their recipes. This greatly inspired me to get back into the blogging game! While some of the recipes I found are great in theory, they lack in directions - literally. I pride myself on being very thorough and really make an effort to be explicit and clear in my instructions. I hope my readers benefit from and enjoy that aspect of my blog. 

With a little more free time on my hands and room in my brain for inspiration and creativity, I can't wait to get back at it! First recipe will be posted this week and it's a good one! 

I will leave you with a picture of my precious pup, Milli, and invite you to return later this week for some notable gnocchi... Stay tuned!